CSharp:Creare un servizio
From Aino Wiki
Contents
Applicazione di tipo Servizio
Vedere anche: Tips Avanzati
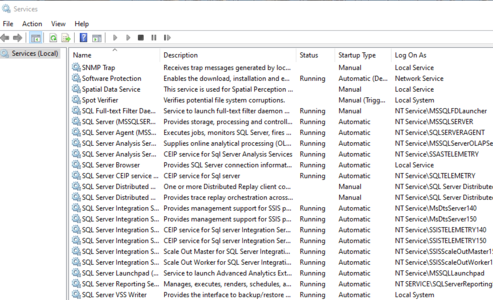
Per visualizzare la seguente finestra dei servizi digitare: Win + R e nel riquadro "Run" scrivere:
services.msc
E' una applicazione gestita dal sistema operativo e che non richiede interazione da parte dell'utente. Solo in fase di installazione può esser necessaria una configurazione iniziale da parte di un utente esperto e anche il tipo di avvio: manuale o automatico.Si tiene d'occhio anche dalla utility: "services".
Attenzioni
Interazioni con Desktop
Cosa fondamentale è che i servizi non abbiano controlli di tipo Windows Form se malaguratamente dovesse accadere che comunque è necessario riutilizzarne "sub"-funzionalità o comunque occorre visualizzare popup o finestre il servizio DEVE essere abilitato per questi eseguibili!
Dal Service manager, selezionare il servizio, tasto dx e selezionarne le proprietà quindi sul TAB "logOn" check su "Allow service to interact with desktop".
Attenzione questa impostazione NON E' SUFFICIENTE su Windows 2012 R2, perchè anche se impostata non funzionerebbe a meno di non cambiare una chiave di registro impostata di default a non consentire l'interazione del servizio (infischiandosene di avvertire l'utente in merito....). Tale chiave di registro è modificabile mediante RegEdit.
- Chiave: NoInteractiveServices
- Percorso:
HKEY_LOCAL_MACHINE\SYSTEM\CurrentControlSet\Control\Windows
Origine del pacchetto
Se vi dovesse capitare di spostare una cartella di files di un servizio al fine di aggiornarlo o installarlo attenzione da dove lo fate passare durante il "trasporto". Quando i files del servizio provengono da un origine diversa che dal File System perché ad es. lo si è scaricato da Internet, ci possono essere problemi di sicurezza cosa che si potrà capire guardando l'Event Viewer di Windows.
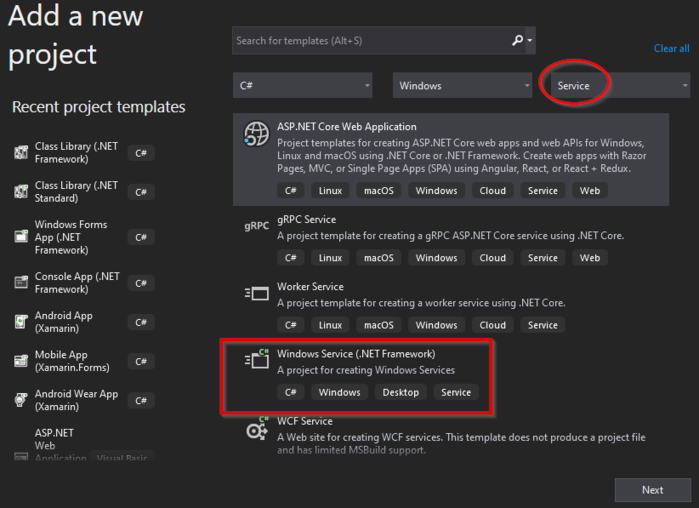
Un semplice servizio Windows, passi salienti
I servizi windows posson esser molto più complessi del seguente e consistere in più thread. Segue un esempio con la sola struttura essenziale e con un thread, il più semplice. Dopo aver creato la struttura base è NECESSARIO anche creare la procedura di installazione.
Tutorial aggiornato dal sito di Microsoft: docs.microsoft.com
Program.cs
Segue uno stralcio del punto di ingresso principale. Notare la sezione#if per il collaudostatic void Main() { ServiceBase[] ServicesToRun; ServicesToRun = new ServiceBase[] { new MainService() }; #if DEBUG // Si fa fare qui quello che in realtà, nel funzionamento normale del Servizio, fa il // Sistema Operativo ovvero chiamare il Metodo "OnStart" che è nel 'MainService.cs' MailDispatcher _mailDispatcher = new MailDispatcher(); _mailDispatcher.Start(); #elif RELEASE ServiceBase.Run(ServicesToRun); #endif }
MainService.cs
Il nome di default del servizio è 'Service1.cs'. File di cui è possibile vedere il codice solo cliccando col tasto Dx del mouse sul file, in solution explorer, e scegliendo "view code".public partial class MainService : ServiceBase { private static Logger logger = LogManager.GetCurrentClassLogger(); private MailDispatcher _mailDispatcher; // = new MainEngine(); public MainService() { InitializeComponent(); if (!string.IsNullOrEmpty(Config.ServiceName)) { //ServiceName = Config.ServiceName; // ToDo } _mailDispatcher = new MailDispatcher(); } // Metodo chiamato dal OS quando si esegue quanto nel 'Program.cs' // è scritto così: "ServiceBase.Run(ServicesToRun);" protected override void OnStart(string[] args) { _mailDispatcher.Start(); } protected override void OnStop() { logger.Info("[OnStop()] Prima dello Stop"); _mailDispatcher.Stop(); logger.Info("[OnStop()] Dopo dello Stop"); } }
Stando all'esempio, il codice con l'algoritmo principale costituente il thread atomico lo colloco in una classe\file a parte così fatto negli aspetti salienti:
using KTBOQAMailDispatcher.Const;
using KTBOQAMailDispatcher.DAO;
using KTBOQAMailDispatcher.Helper;
using KTBOQAMailDispatcher.Models;
using NLog;
using System;
using System.Collections.Generic;
using System.Net.Mail;
using System.Threading;

namespace xxx
{
    public class MailDispatcher //: BaseSqlDAO  Servirà????
    {
        private static Logger logger = LogManager.GetCurrentClassLogger();
        //... etc ....
        public static bool End = false;


        #region Event Handlers
        public void Start()
        {
            // Da qui avvio i singoli thread esecutori
            Thread processMailDispatch = new Thread(new ThreadStart(ProcessMailDispatch));
            processMailDispatch.Start();
        }

        public void Stop()
        {
            try
            {
                End = true;
                logger.Info("[Stop()]");
            }
            catch (Exception ex)
            {
                logger.Error("[Stop()]", ex);
            }
        }

        private void ProcessMailDispatch()
        {
            int rowsAffected = 0;
            try
            {
                while (!End)
                {
                    logger.Info(string.Format("Start at {0}, loop time cycle {1}.",
                                                DateTime.Now.ToString("dd/MM/yyyy HH:mm:ss.fff"),
                                                Config.WaitIntervallMilliseconds));

                    //rowsAffected = Step1();

                    //rowsAffected = Step2();

                    //rowsAffected = Step3();

                    Thread.Sleep(Config.WaitIntervallMilliseconds);
                }
                logger.Info("[Start()] E' stato richiesto lo stop!");
            }
            catch (Exception ex)
            {
                //IsRunning = false;
                logger.Error("[Start()]", ex);
            }
        }
        #endregion

// ... etc etc ...
    }
}
Il metodo Sleep intervalla i momenti di esecuzione. L'argomento dello Sleep indica il tempo espresso in millisecondi durante il quale il thread rimarrà bloccato.
ProjectInstaller.cs
File indispensabile alla procedura di installazione del processo, si crea ...
...in fase di sviluppo... seguire la guida indicata sotto (copiata da sito Microsoft)...
Before you run a Windows service, you need to install it, which registers it with the Service Control Manager. Add installers to your project to handle the registration details.
- In Solution Explorer, from the shortcut menu for MyNewService.cs, choose View Designer (o doppio click sul file Service1.cs).
- In the Design view, select the background area, then choose Add Installer from the shortcut menu.
By default, Visual Studio adds a component class named ProjectInstaller, which contains two installers, to your project. These installers are for your service and for the service's associated process.
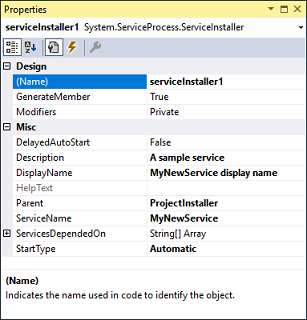
- In the Design view for ProjectInstaller, select serviceInstaller1, then choose Properties from the shortcut menu.
- In the Properties window, verify the ServiceName property is set to MyNewService.
- Add text to the Description property, such as A sample service.
This text appears in the Description column of the Services window and describes the service to the user.
- Add text to the DisplayName property. For example, MyNewService Display Name.
This text appears in the Display Name column of the Services window. This name can be different from the ServiceName property, which is the name the system uses (for example, the name you use for the net start command to start your service).
- Set the StartType property to Automatic from the drop-down list.
- When you're finished, the Properties windows should look like the following figure:
- In the Design view for ProjectInstaller, choose serviceProcessInstaller1, then choose Properties from the shortcut menu. Set the Account property to LocalSystem from the drop-down list.
This setting installs the service and runs it by using the local system account.
installutil MyNewService.exe
The LocalSystem account has broad permissions, including the ability to write to the event log. Use this account with caution, because it might increase your risk of attacks from malicious software. For other tasks, consider using the LocalService account, which acts as a non-privileged user on the local computer and presents anonymous credentials to any remote server. This example fails if you try to use the LocalService account, because it needs permission to write to the event log.
For more information about installers, see How to: Add installers to your service application.
Thread
Creare un Thread
Leggere da csharp-examples comunque sia ecco in evidenza quel che occorre creare come aspetto minimale, segue la procedura per far vedere al sistema operativo il metodo, con l'algoritmo principale, da considerare come thread atomico.
public void Start()
{
	// Da qui avvio i singoli thread esecutori
	Thread processMailDispatch = new Thread(new ThreadStart(ProcessMailDispatch));
	processMailDispatch.Start();
}
Usare il timer
Esempio Semplice:
private void Metodo()
{
	System.Timers.Timer timer = new System.Timers.Timer();
	timer.Interval = m_watchdogRefreshInterval; // Millisecondi
	timer.Elapsed += new ElapsedEventHandler(this.OnTimerWatchdog);
	timer.Start();
}


public void OnTimerWatchdog(object sender, ElapsedEventArgs args)
{
	//Cose da fare ad ogni tick !
}
Esempio proposta (copiato da stackoverflow.com) di un timer con handlers dinamico (usando la reflection):
public void PID(decimal _actualSpeed, Decimal _speedRequest, out Decimal _pwmAuto, out decimal _preValReg)
{
    _pwmAuto = valReg;
    _preValReg = valReg - 1;

     // Because we cannot use [out] variables inside the anonymous degegates,
     // we make a value copy
     Decimal pwmAutoLocal = _pwmAuto;
     Decimal preValRegLocal = _preValReg;

    _timer = new System.Timers.Timer();
    _timer.Interval = (3000);
    _timer.Elapsed += (sender, e) => { HandleTimerElapsed(_actualSpeed, _speedRequst, pwmAutoLocal, preValRegLocal); };
    _timer.Enabled = true;
    // {....}

}

static void HandleTimerElapsed(Decimal actualSpeed, Decimal speedRequst, Decimal pwmAuto, Decimal preValReg)
{
   // (...)
}
ATTENZIONE gli eventi vanno spenti in quanto anche dopo la distruzione dell'oggetto padre le callback saranno comunque attive!
Da docs.microsoft.com
Timer.Stop Arresta la generazione dell'evento Elapsed impostando Enabled su false.
using System;
using System.Timers;

public class Example
{
   private static System.Timers.Timer aTimer;

   public static void Main()
   {
      SetTimer();

      Console.WriteLine("\nPress the Enter key to exit the application...\n");
      Console.WriteLine("The application started at {0:HH:mm:ss.fff}", DateTime.Now);
      Console.ReadLine();
      aTimer.Stop();
      aTimer.Dispose();

      Console.WriteLine("Terminating the application...");
   }

   private static void SetTimer()
   {
        // Create a timer with a two second interval.
        aTimer = new System.Timers.Timer(2000);
        // Hook up the Elapsed event for the timer.
        aTimer.Elapsed += OnTimedEvent;
        aTimer.AutoReset = true;
        aTimer.Enabled = true;
    }

    private static void OnTimedEvent(Object source, ElapsedEventArgs e)
    {
        Console.WriteLine("The Elapsed event was raised at {0:HH:mm:ss.fff}",
                          e.SignalTime);
    }
}
Scrivere nel Windows EventLog
Guida Microsoft MSN
Da stackoverflow ecco come scrivere nel Events Log:this.ServiceName = "MyService"; this.EventLog = new System.Diagnostics.EventLog(); this.EventLog.Source = this.ServiceName; this.EventLog.Log = "Application";
((ISupportInitialize)(this.EventLog)).BeginInit();
if (!EventLog.SourceExists(this.EventLog.Source))
{
    EventLog.CreateEventSource(this.EventLog.Source, this.EventLog.Log);
}
((ISupportInitialize)(this.EventLog)).EndInit();
Infine usarlo come segue:
this.EventLog.WriteEntry("My Eventlog message.", EventLogEntryType.Information);
Installazione, didinstallazione
- Tool InstalUtil docs.microsoft.com
- Guida specifica docs.microsoft.com
- Come da procedura creazione servizio: docs.microsoft.com
- Aprire il Prompt DOS da Visual Studio. Dall'IDE andare su:
Tools\Command Line\Developer Command Lie - spostarsi nella cartella
Bindove è collocato l'eseguibile del servizio che supporremmo: 'MyNewService.exe' - digitare:
installutil MyNewService.exe
Per disinstallare:
installutil /u <yourproject>.exe
Guide, tutorials, help
Servizio con temporizzatore da c-sharpcorner, usa l'oggetto Timer() che scatena l'evento collegato al lavoro da compiere ciclicamente ad intervalli prefissati. (Usa Framework 4.5)
Esempio di schedulatore da codeproject (Maggio del 2013)
Eseguire debug
Soluzione 1
La seguente nel codice serve ad attaccarsi ad un servizio per debuggarlo. Si compila in Debug e si copiano le DLL nella cartella prevista dal servizio, si avvia il servizio ad un certo punto quando il flusso finisce sul seguente gruppo di istruzioni si apre un popup su visualstudio che chiede se eseguire debug, si sceglie YES e poi "VisualStudio " si noterà che la finestra si predispone sul debug.#if DEBUG if (System.Diagnostics.Debugger.IsAttached == false) { System.Diagnostics.Debugger.Launch(); } #endif
Soluzione 2
La seguente è per lanciare "a mano", ma solo in modalità di debug quindi collaudo, il metodo che fa partire l'algoritmo. Infatti nella classe principale (Service.cs se non s'è provveduto a rinominarla) c'è, nel costruttore, l'avvio al metodo che fa partire l'algoritmo, qui si può inserire il seguente affinchè si forzi la sua esecuzione senza attendere che sia il sistema operativo a farlo in quanto trattasi di servizio.
In Service.cs:
public partial class Service : ServiceBase
{
	public Service()
	{
		InitializeComponent();

	#if DEBUG
		string[] args = "".Split(',');
		this.OnStart(args);
		Thread.Sleep(10 * 1000); // Serve per non far uscire da questo metodo e dal thread principale
		//                          e consentire l'esecuzione del thread da testare che è nell'OnStart()
	#endif
	}
}
//...
protected override void OnStart(string[] args)
{
   // AttachDebugger();
	if (leaderElectionEnabled)
	{
		service = new ServiceManager(waitTime, azureAccountName, azureAccountKey, azureContainerName, azureLockObjectName, TimeSpan.FromSeconds(leaseDuration));
	}
	else
	{
		service = new ServiceManager();
	}
	service.Start();
}
L'esecuzione proseguirà col metodo 'Start()' nella classe ServiceManager()
Per completezza nel file Program.cs c'è la parte che chiama il costruttore della classe Service, così:
static void Main()
{
	ServiceBase[] ServicesToRun;
	ServicesToRun = new ServiceBase[]
	{
		new Service()
	};
	ServiceBase.Run(ServicesToRun);
}
Varie
Fermare un servizio bloccato
- Prendere il PID del processo associato al servizio
- Aprire il prompt comandi di DOS con diritti di amministratore
- Digitare:
C:\> taskkill /pid [numero PID] /f

SUCCESS: The process with PID .... has been terminated.


