Difference between revisions of "CSharp:IIS"
From Aino Wiki
(→Nuova Applicazione Web/Sito Web) |
(No difference)
|
Latest revision as of 12:04, 13 April 2024
Contents
Servizio
HTTP o HTTPS
E' possibile far coesistere entrambe le tipologie di protocollo sia con IIS Express (Web Server integrato in Visual Studio) e sia con IIS.
IIS Express
Quando si crea un progetto WebAPI al più si aggiungerà l'uso del SSL, in questo caso però anche la connessione HTTP funzionerà. Nella situazione di default IIS Express predisporrà due URL che risponderanno su porte differenti ma con protocolli diversi, notare la seguente immagine la cui proprietà del progetto WebAPI selezionato è visualizzato nella colonna di sx.
IIS
Nuova Applicazione Web/Sito Web
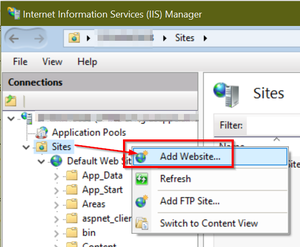
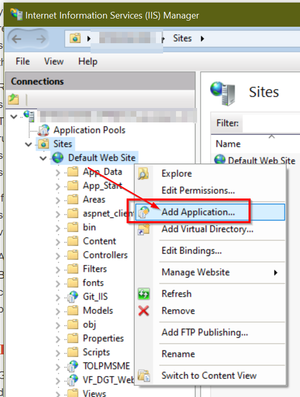
Ci sono due aprrocci, creare un nuovo Sito Web che si aggiunge al Default "Default Web Site" oppure estendere il "Default Web Site" con una Applicazione Web.
Nuovo Sito Web:
Nuova Applicazione Web:
Nuova Applicazione Web
Se il sito web è sotto IIS occorrerà impostare il binding affinché si possa lavorare in doppia modalità.
Supponendo di aver posto il proprio sito sotto il "Default Web Site":
- selezionare il nodo Default Web Site,
- nel pannello di estrema sinistra intitolato "Actions", selezionare bindings
- se non già predisposto l'HTTP cliccare sul pulsante "Add..." ed aggiungere l'ulteriore protocollo non impostato precedentemente
Aggiungere il bindigs all'HTTP
Risultato finale:
Debug
Ora per fare debug del sito sotto IIS occorrerà agganciare Visual Studio al processo dell'IIS come segue:
Quindi, fate attenzione che sia checcato "Show process from all users" !!!
SSL su IIS
Da Microsoft:
Per configurare SSL in IIS 7 o versione successiva:
- Creare o ottenere un certificato. Per il test, è possibile creare un certificato autofirmato.
- Aggiungere un'associazione HTTPS.
Per informazioni dettagliate, vedere come configurare SSL in IIS 7.
Individuare i certificati installati sul Sistema Operativo
Premere Windows key + R per lanciare un comando\applicazione da eseguire, digitare certmgr.msc. premere Enter.
Si apre il seguente:
Notare la penultima colonna "Intended Purposes" che ha "Server Authentication" ovvero serve al Client per certificare che stà "dialogando" col server atteso. Questo certificato è un certificato di Test prodotto per scopi di sviluppo tramite IIS.
Certificato Client SSL
SSL fornisce l'autenticazione tramite certificati di infrastruttura a chiave pubblica. Il server deve fornire un certificato che autentica il server per il client.
Per usare i certificati client con SSL, è necessario un modo per distribuire i certificati firmati agli utenti.
Per configurare IIS in modo che accetti i certificati client, aprire Gestione IIS e seguire questa procedura:
- Fare clic sul nodo sito nella visualizzazione albero.
- Fare doppio clic sulla funzionalità Impostazioni SSL nel riquadro centrale.
- In certificati clientselezionare una di queste opzioni:
- Accept: IIS accetterà un certificato dal client, ma non ne richieda uno.
- Require: richiedere un certificato client. (Per abilitare questa opzione, è necessario selezionare anche "Richiedi SSL")
Che produce quanto segue in mancanza di certificato:
HTTP Error 403.4 - Forbidden
The page you are trying to access is secured with Secure Sockets Layer (SSL).
È anche possibile impostare queste opzioni nel file ApplicationHost.config collocato in C:\Windows\System32\inetsrv\config:
<system.webServer>
    <security>
        <access sslFlags="Ssl, SslNegotiateCert" />
        <!-- To require a client cert:
        <access sslFlags="Ssl, SslRequireCert" /> -->
    </security>
</system.webServer>
Il flag SslNegotiateCert indica che IIS accetterà un certificato dal client, ma non ne richiede uno (equivalente all'opzione "Accept" in Gestione IIS). Per richiedere un certificato, impostare il flag SslRequireCert . Per il test, è anche possibile impostare queste opzioni in IIS Express nel file ApplicationHost locale. File di configurazione, situato in "Documents\IISExpress\config".
Validazione del certificato
Nel seguente esempio completo per la gestione della chiamata ad una WebAPI remota c'è una regione (delimitata tra #if DEBUG ed #endif) in cui si istanzia una collback anonima deputata alla verifica del certificato server ricxevuto dal client, in questo esempio si restituisce SEMPRE true.
var handler = new HttpClientHandler();
handler.UseDefaultCredentials = true;
handler.PreAuthenticate = true;
handler.SslProtocols = System.Security.Authentication.SslProtocols.Tls12
							| System.Security.Authentication.SslProtocols.Tls11
							| System.Security.Authentication.SslProtocols.Tls;
handler.ClientCertificateOptions = ClientCertificateOption.Automatic;
#if DEBUG
//Certificato non trusted di Default?
ServicePointManager.ServerCertificateValidationCallback
							= new RemoteCertificateValidationCallback
								(  delegate {
										m_logger.Warn(string.Format("Forcing to true the Certification validation!"));
										return true;
									});
#endif
HttpClient HTTPClient = new HttpClient(handler);
#region Imposto la Basic Authentication
if (!string.IsNullOrWhiteSpace(strUserName)
	&& !string.IsNullOrWhiteSpace(strPassword))
{
	string credential = string.Format("{0}:{1}", strUserName, strPassword);
	byte[] arrByteCredential = Encoding.ASCII.GetBytes(credential);
	string toBase64CodedCredential = Convert.ToBase64String(arrByteCredential);
	HTTPClient.DefaultRequestHeaders.Authorization
					= new AuthenticationHeaderValue("Basic"
													, toBase64CodedCredential);
}
#endregion
//es. usando IIS la Web API come Default Web Site: http://localhost/tol/integrations/pm/
HTTPClient.BaseAddress = new Uri(strURI);

var result = HTTPClient.GetAsync(requestURI).Result;

if (result.IsSuccessStatusCode) //HTTP result code: 200
{
	if (result.Content != null)
	{
	}
}
else
{
}
Nel seguente esempio si è migliorata la verifica del certificato nella callback anonima anche se si restituisce sempre TRUE (questo perché è un metodo di collaudo e test):
#if DEBUG
	ServicePointManager.ServerCertificateValidationCallback = new RemoteCertificateValidationCallback(
		delegate (object sender, X509Certificate certificate
							   , X509Chain chain
							   , SslPolicyErrors sslPolicyErrors)
			{
				//ATTENZIONE nel caso in cui la chiamata è HTTP questo metodo NON sarà MAI eseguito!
				bool blnOUT = true;
				bool blnProcessedCertOk = true;
				try
				{
					if (chain != null
						&& chain.ChainElements != null
						&& chain.ChainElements.Count > 0)
					{
						blnProcessedCertOk = sslPolicyErrors == SslPolicyErrors.None; //= No SSL policy errors
						blnProcessedCertOk = blnProcessedCertOk && chain.ChainElements.Count == 3;

						m_logger.Debug("\r\n\tsslPolicyErrors = '{0}' (SslPolicyErrors.None => OK)\r\n"
									+ "\tchain.ChainElements.Count (={1}) == 3 ? {2} (True => OK)"
										, sslPolicyErrors.ToString()
										, chain.ChainElements.Count
										, chain.ChainElements.Count == 3
									);

						if (chain.ChainElements[chain.ChainElements.Count - 1].Certificate != null
							&& chain.ChainElements[chain.ChainElements.Count - 1].Certificate.RawData != null)
						{
							byte[] foundCert = chain.ChainElements[chain.ChainElements.Count - 1].Certificate.RawData;
							blnProcessedCertOk = blnProcessedCertOk
												&& foundCert != null && foundCert.Length > 0;
							m_logger.Debug("\r\n\tLength of server certificate found = {0} bytes\r\n" +
											"\tchain.ChainPolicy.VerificationFlags = '{1}'\r\n" +
											"\tchain.ChainPolicy.RevocationFlag = '{2}'\r\n" +
											"\tchain.ChainPolicy.RevocationMode = '{3}'"
										, foundCert == null ? "null" : foundCert.Length.ToString()
										, chain.ChainPolicy.VerificationFlags.ToString()    //sicuramente ok se=X509VerificationFlags.None
										, chain.ChainPolicy.RevocationFlag.ToString()
										, chain.ChainPolicy.RevocationMode.ToString()       //sicuramente ok se=X509RevocationMode.Online
										);
						}
						else
						{
							m_logger.Error("Certificato vuoto!");
						}
					}
					else
					{
						m_logger.Error("chain.ChainElements VUOTA!");
					}
				}
				catch (Exception ex)
				{
					m_logger.Error(ex);
				}
				m_logger.Warn(string.Format("Si imposta a VALIDO SEMPRE il certificato! Ma è veramente valido ? {0}."
											, blnProcessedCertOk));
								   return blnOUT;
		});
#endif
Richiesta di un certificato
Sostanzialmente per poterlo richiedere innanzitutto occorrerò creare un file *.csr quindi dopo si sottopone tale file alla Autority la quale al termine del suo processo interno rilascerà il file di certificato
(Per vedere il csr usare: digicert.com)
Creazione csr mediante IIS
- Aprire il configuratore IIS
- Selezionare il nodo radice sulla dx (nome del server)
- Sulla striscia di dx, click sul link "Create Certificate Request"
- Dal Form aperto:
- Common name: inserire il nome dell'applicazione, o anche solo il nome del Server: om1n1000.prova.it
FQDN ! (attenzione alternativamente si può usare il SANs con l'IP della macchina))
- Organization: Vodafone Italy
- Organizational unit: IT
- City: Milano
- State: Lomba
- Country: IT
- ...click su NEXT
- Prossimo Form
- Cryptographic service provider: Microsoft RSA SChannel ....
- Bit lenght: 2048
I certificati son di 3 tipi:
- Public Trust Certificates
- Private Trust / Internal Certificates
- Self Signed Certificates
Installazione di un Certificato sul Server con IIS
Dopo aver ricevuto un certificato (mi riferisco a quello che certifica il Server nei confronti dei client) questo dovrà essere installato oltre che sui client anche e soprattutto sul Server.
Ad esempio l'estensione dei files certificato posson esser: crt, p7b, cer.
Si procede con l'installazione del certificato che andrà ad unirsi agli altri eventualmente già esistenti (associati a varie applicazioni Web installate).
Aprire IIS, selezionare il nodo radice che rappresenta il Web Server, fare doppio click sull'icona "Server Certificates":
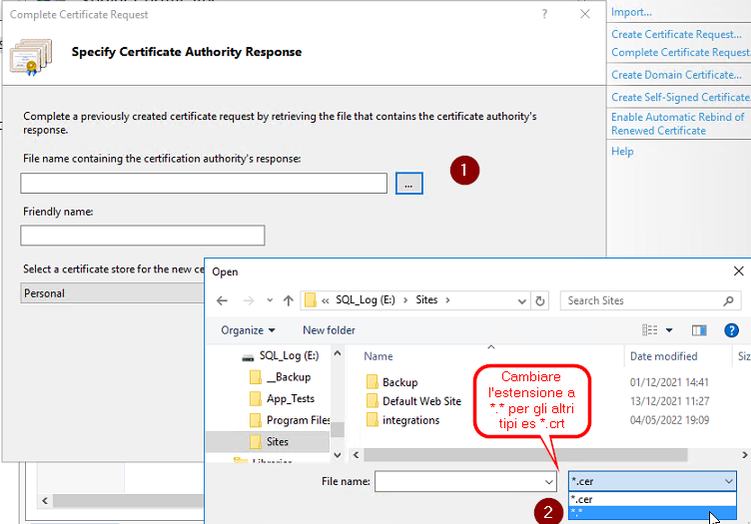
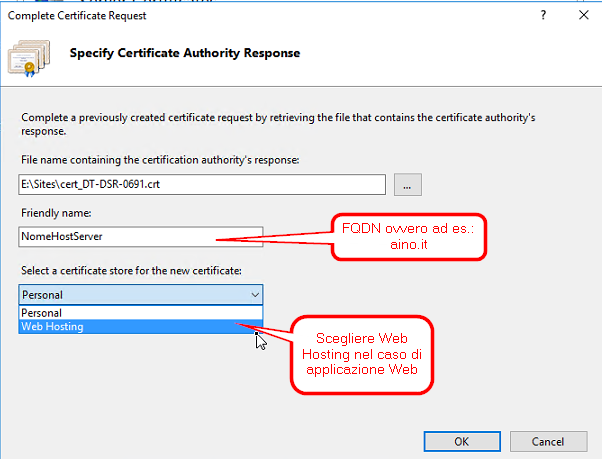
Cliccare sulla striscia di dx "Complete Certificate Request" (voce fuorviante ma che significa che si va a concludere il ciclo iniziato con la richiesta del certificato):
Specificare il certificato e tipologia:
quindi
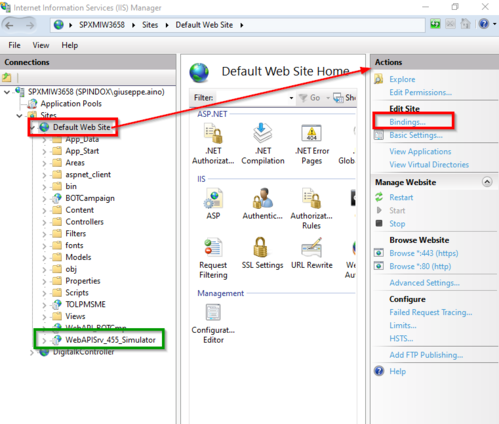
A questo si passa ad associare il certificato appena installato all'applicazione Web o gruppo di applicazioni. Nel seguente caso per associarlo all'applicazione "WebAPI_BOTCmp" è sufficiente selezionare il nodo "Default Web Site", quindi cliccare su "Bindings" sulla colonna di dx:
a questo punto è tutto pronto ed i client potranno accedere in via HTTPS senza ricevere l'errore sulla privacy: "NET::ERR_CERT_AUTHORITY_INVALID".
Possibili errori
intermediate certificates missing
One or more intermediate certificates in the certificate chain are missing.
To resolve this issue, make sure that all of the intermediate certificates are installed.
For more information, see http://support.microsoft.com/kb/954755."
Soluzione 1
Da aip.im
Thawte and more certificate authorities are currently changing from 1024 bits based root certificates to 2048 bits. All certificates now require Intermediate Certificate Authorities and that’s the reason for the error message.
Here’s the solution:
Download the Intermediate CA bundle from your certificate authority. You can find the Thawte CA bundles here: https://search.thawte.com/support/ssl-digital-certificates/index?page=content&id=AR1384&actp=RELATED_RESOURCE
Click Start -> Run
Type MMC and click enter
File -> Add/Remove Snap-in
Select Certificates and click Add
Select Computer account
Next
Next
OK
Expand Certificates (Local Computer)
Right click Intermediate Certification Authorities
select All Tasks -> Import
Next
Locate the .p7b file downloaded from your certificate authority
Next
Finish
Soluzione 2
Da stackoverflow.com
I imported DigiCert High Assurance CA in Trusted Root on both TFS Build and Application server.
Mappa e Link
C# | WebAPI | Sicurezza WEB Application
Visual Studio | MS SQL | Dizionario
Parole chiave:


